
 Live Chat
The Making of Panic In The Dark (Part 2)

This is part two of “The Making of Panic in the Dark,” a zombie-themed, multiplayer HTML5 game using Node.js, Express, MySQL, Sequelize, and Socket.IO. If you are just finding this article I would strongly suggest you check out The Making of Panic in the Dark Part 1.
Going into the second sprint we had a strong project management outline using “HacknPlan” (free web app that models Atlassian’s “Jira”), which defines two bug fixes and roughly 230 hours of development tasks ranging from programming, art, design, writing, marketing, audio, and new features.
The first item on our Kanban Board was labeled “urgent!” and corresponded to a potential pivot point for the game, a decision that needed to be made before any other game features could be coded. Do we refactor the Vanilla JavaScript code that was written for the initial sprint, or do we do a total re-write using the JavaScript library Phaser?
We weighed the advantages and disadvantages of using Phaser. On one hand, the player movement bug would be solved inherently by porting to Phaser as it handles movement and collision really well. Phaser also easily builds tile maps and renders animations based off of sprite sheets. The downside: Phaser 3 is considered “bleeding edge” technology with few examples and documentation that leaves a lot to be desired.
TO PHASER, OR NOT TO PHASER: THAT IS THE QUESTION
With the amount of time allotted for this sprint, I decided to play with Phaser during off-hours just to see if it was feasible to re-write the game and still meet our deadline. I was able to get a basic single player version of the game up and running in just two evenings by looking at some examples and r̶e̶a̶d̶i̶n̶g̶ t̶h̶r̶o̶u̶g̶h̶ t̶h̶e̶ d̶o̶c̶u̶m̶e̶n̶t̶a̶t̶i̶o̶n̶ digging through the distribution file to see what the functions were actually doing; things were looking up for the Phaser re-write.
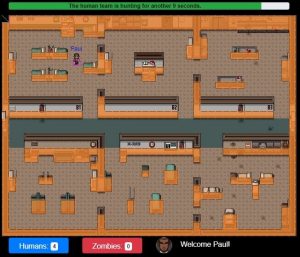 Not only was the player movement bug fixed, but a lot of quality of life changes were made in the initial Phaser build of the game. Sprites were animated in four directions based off the sprite sheets I had, and the map was rendered using tilesets and an array (8147 lines of code in the map.json—I’ll explain more in a bit). I was also able to easily normalize the character’s speed so moving diagonally would not be an advantage. Debugging was extremely easy with a customized function (imaged above), and it allowed me to re-architect the game into a single element which could be embedded at a later date into third-party HTML5 sites such as Kongregate or Itch.io.
Keeping in mind that Panic in the Dark is a game made solely for the purpose of pushing our development skills to the limits, the other major consideration I had to take into account was the learning experience achieved by using a bleeding edge library. All the libraries used up to this point have been well documented and widely used. By using Phaser 3 we could challenge ourselves even more.
IT’S-A ME, TILE-MAPS
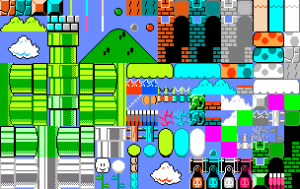 In The Making of Panic in the Dark Part 1 I mentioned using Tiled Map Editor to create my collision array, which was all well and good, but it didn’t really utilize the full power of tilemaps and I was a little disappointed by that. But what is a tilemap, you may ask? Tilemaps are a clever way to re-use a single image to paint an entire scene using sections of that image. Take a look at Mario Brothers, a Nintendo classic 8-bit game that was only 31 Kilobytes in size! How is this possible? Tilemaps, of course! The image above is what’s called a tileset. It is similar to what created all of the Mario maps and worlds that we all know and love, a 304×192 pixel image broken out into 16x x 16px squares that can be re-used an infinite number of times to create as many worlds as the mind can imagine. I used the same methodology when re-creating the Panic in the Dark map for our second sprint. First, I combined all the assets into a single tileset and used that to paint layers (much like you would in Photoshop) and created an array which assigns each 16px x 16px section of our viewable game space into an image.
Below is a very condensed version of the map.json which was created from the Tiled Map Editor after creating the Panic in the Dark map.
{ "height":30,
 "infinite":false,
 "layers":[
        {
         "data":"ZQIAAGUCAABlAgAAZQIAAGUCAABlA...",
         "encoding":"base64",
         "height":30,
         "name":"below",
         "opacity":1,
         "type":"tilelayer",
         "visible":true,
         "width":40,
         "x":0,
         "y":0
        },
        {
         "draworder":"topdown",
         "name":"spawn",
         "objects":[
                {
                 "height":0,
                 "id":5,
                 "name":"sp1",
                 "point":true,
                 "rotation":0,
                 "type":"",
                 "visible":true,
                 "width":0,
                 "x":163,
                 "y":92.5
                }],
         "opacity":1,
         "type":"objectgroup",
         "visible":true,
         "x":0,
         "y":0
        }],
 "nextobjectid":13,
 "orientation":"orthogonal",
 "renderorder":"right-down",
 "tiledversion":"1.1.5",
 "tileheight":16,
 "tilesets":[
        {
         "columns":31,
         "firstgid":1,
         "image":"tilesets\/tilesets.png",
         "imageheight":512,
         "imagewidth":511,
         "margin":0,
         "name":"tileset",
         "spacing":0,
         "tilecount":992,
         "tileheight":16,
         "tileproperties":
            {
             "0":
                {
                 "collides":true
                },
            },
         "tilewidth":16
        }],
 "tilewidth":16,
 "type":"map",
 "version":1,
 "width":40
}
I won’t get too in-depth on this, but basically, the JSON outlines the size of the map, provides collision data and spawn points, draws the map’s layers, and performs a lot of other functions.
 The best part of using tilemaps is the ability to layer. Panic in the Dark just became a faux 3-D game! The character is able to move behind walls, stand at the foot of a bed, and go places that the character was unable to in the first sprint due to lack of map depth.
This, of course, required a complete re-creation of the map since the first variation was a flat .JPEG image that the character walked on top of. Overall I was very pleased with how the flow of the game turned out using the tilemap, and it was another vote on the ballot for team Phaser.
ONE SERVER TO RULE THEM ALL…OH, WAIT…
It was extremely quick to get the game up and running to this point, but once multiple players got involved, production really slowed down. In fact, one of the biggest unforeseen challenges of using Phaser was how much the architecture for the multiplayer networking would have to change.
Sprint 1 was almost the ideal setup. You had the server being the central point of truth while the clients would make requests to the server. The server would verify the request and send a response back to the client if the action they wanted to take was valid. The only downside was the amount of data that had to be sent constantly from the client to the server and vice versa. In fact, all the data from each player was getting sent to the server and back 30 times a second (I can’t believe we had 27 players in a single game with no latency issues)!
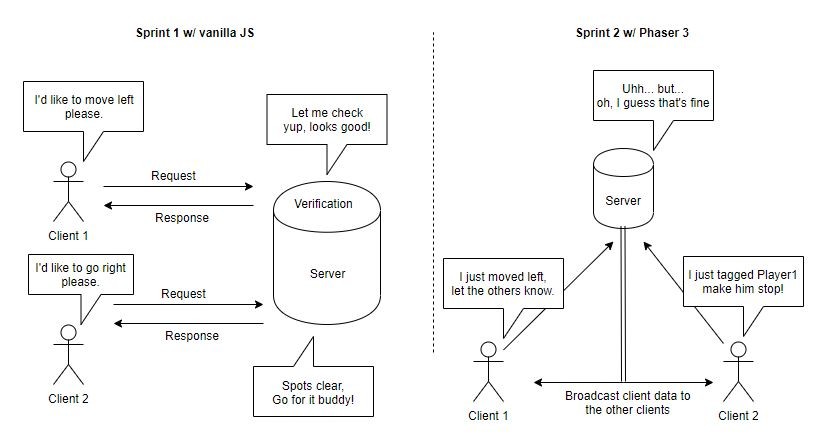
Sprint 2 had to be completely re-vamped and was developed out of the necessity of using the Phaser library, not because it was a pre-planned design decision. At first, it started well. The client only sent information to the server when movement was detected, so there wasn’t a lot of back and forth duplicate data like in Sprint 1. The downside is that Phaser runs on the client side and each client now has its own collision detection and movement logic built into it. Instead of the server being the central point of truth, you have the client moving itself, then telling the server it moved, then the server broadcasting that information out to the other clients, the clients taking in that information and updating their own game instance with the other player’s data. This was a bit convoluted compared to what we initially had. We had to build in a double verification sequence for when players were tagged so that information was not dependent on a single client. Trust me, having a single client determining if a player was caught or not resulted in very poor user experience.
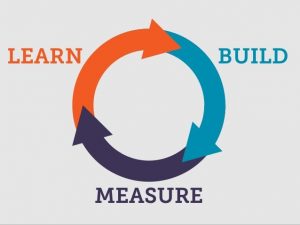 Overall the architecture had drastically departed from my ideal setup, but I was able to gain valuable knowledge about the application. At this stage I would consider pivoting, a concept I initially learned about by reading “The Lean Startup” by Eric Ries, but have since come to know it as the ever-popular buzz word “Agile Development”. Getting through the Build-Measure-Learn feedback loop as quickly as possible and making decisions about the application are crucial to saving a dev team, or even a big company, valuable resources. Sometimes it can be tough to take a step back and look at a month’s worth of long hours objectively, and say “we have to scrap it.” It’s especially hard if you are the one who is closest to the project, but it’s for the greater good of the product and you just have to swallow your pride and make the necessary adjustments.
So what would the adjustments be in this case? I would either try to emulate the Sprint 1 architecture and implement the player movement events from Sprint 2, or if I absolutely had to use this type of setup due to Phaser restricting where the logic occurs, I would attempt to run Phaser headless on the server and emit the display data to the client for the players to view. I could then conduct testing on the performance of Phaser running the server side and go through the Build-Measure-Learn loop once again.
YOU GUYS GOT SHIRTS?!
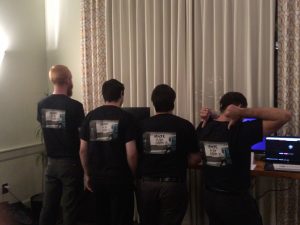 We wanted to one-up ourselves from our initial sprint which included a 1-page Game Design Document as a handout. This time around, I revised the document into an informational sheet describing the game, the tech, the storyline and the evolution from Sprint 1. I also had a professional artist draw up a background image for our landing page (which can be seen in this article’s header). This image was used to make up t-shirts for Demo Day. I figured even if our app didn’t work for whatever reason, at least we’d look official. Lastly, I created a short intro video (below) which was playing on repeat on one of our large display monitors.
MOVING FORWARD
This has been a great project, and I’ve had a lot of unique challenges to overcome (which is what I love about coding), but most importantly I’ve learned a lot. Despite the fact that re-writing the game from scratch in a new library was not the best overall experience, it did allow me to look at applications from a different perspective that I would have never seen if I had gone with the “optimal” route. I think if I had to build this game from scratch (again) I would have a lot better understanding of the architecture, my own capabilities, and how long certain tasks take. I plan to take this knowledge with me moving forward as a developer.
One task I really wish we got to implement was metrics. I would love to have data about the application such as the number of users signed up, users logged in, new users for each week, individual wins/losses, kills/deaths, highest scores, games played, total time played, and so on. We started implementation but ran out of time to tie it all together into a nice interface.
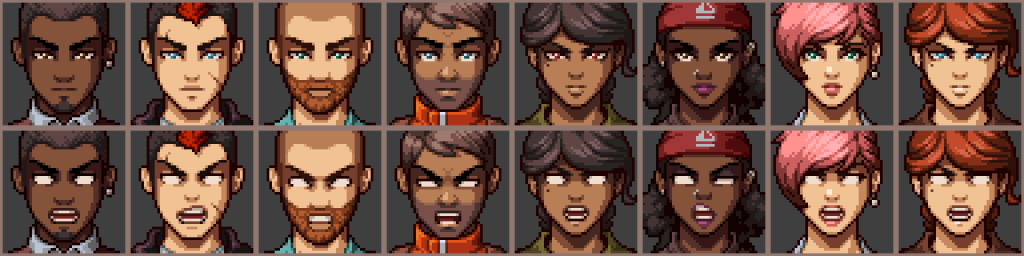
One thought that always crossed my mind was “how can this app make money?” To answer that question, I would add in-game cosmetic enhancements. This would allow players to purchase avatars and sprites, but nothing that would give them an in-game advantage (no one likes pay-to-win!). Below are some examples of the different avatars I have for humans and zombies. I even have sprite sheets that represent each of these characters!
Once the game has a win condition and some sort of in-game currency, it wouldn’t take much to add in these avatars and sprites to allow people to purchase them using in-game currency (which could be acquired with real cash too!).
THANK YOU!
This project was more fun than it was work for me. I really enjoyed the entire process and I hope you enjoyed reading about it. As an engineer I am always looking to make connections in the industry, so please, if you like my work add me on LinkedIn.
Happy coding!